Part I
What we have here is a Warmoth Tele body (chambered alder) and a quarter sawn maple neck featuring a satin nitro finish, a kingwood fretboard, stainless steel medium jumbo frets, 10-16" compound radius, and abalone position dots. The neck carve is the asymmetrical "SRV" ... "like a glove." I'll be adding to and editing this article as things progress.

Check out this neck-to-body joint. That's high-tolerance, precision work; I've never seen a neck/body joint that precise before on a T-style guitar.

The fretboard is just stunning in person. The photo doesn't do it justice.

I still haven't decided on pickups. Thinking SD Antiquities but open to suggestions.
Part II
After much agonizing and deliberation I decided that my original choices, coral and white, were out. The color is........ ReRanch Ocean Turquoise. Now, I wanted this guitar to be a warm color not a cool blue, however, the green abalone dots and the browns and tans of the fretboard convinced me that blue was the way to go. However, RROT has a lot of green in it (in fact, it is a green more than a blue) and combined with a tortoise shell pick guard I can keep the guitar leaning in a warmer direction.
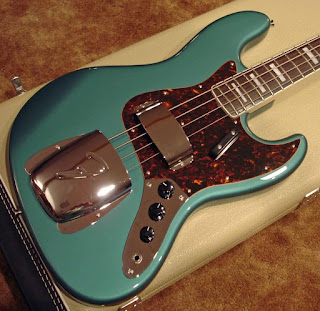
When I saw this bass online I was finally convinced! This might be a Sherwood Green but the ReRanch OT has more green in it than a Fender turquoise and more blue than Fender's Sherwood Green (if all that makes sense) so it should be somewhere in the right neighborhood.
I ordered sanding supplies, sealer, and other assorted finishing stuff from StuMac and the primer, paint and clear coat from ReRanch.
Part III
The first coats of 'sand and seal' followed by sanding with #400 grit paper. Two coats on day one, sand, two coats on day three, sand and prepare for the primer.
It's prime time!
Ah, not ready for prime time. The ReRanch primer I bought was defective (under-pressurized as it turns out). About half way through the top the can just puked up a gob of thick primer on my guitar. What a mess. It wasn't from lack of shaking or a bad nozzle (I tried three) it was just a dud. Contact ReRanch and they had a new can on the way within hours. Nice service.
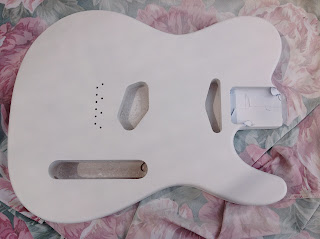
The fresh can of primer showed up and there were no problems at all. The primer layers are done. Four coats lightly sanded with #400 grit paper -- enough to take the shine off but textured enough for the color coat to grab onto.
This photo was taken under an umbrella so it doesn't show its actual color which is bright white. Also, there are a few shadows being cast upon the body.
Ordered a respirator from StuMac so I can shoot the color and clear layers indoors to ensure no dust gets into the finish.
The respirator is not optional folks and I highly recommend you pony up. They're not expensive and they work quite well.

Part IV
Okay, so I shot two cans of ocean turquoise on the body and it looked pretty good; I'd give it a B or B+ but there were a couple of spots that I didn't like. The general approach is to keep shooting color coats until you get what you want but I am trying to avoid a huge buildup of finish (think "think skin") so I wet sanded it all back down to about the first color layer (sanded through to the primer in a few spots) and ordered another can of OT from RR. As a side note, that OT sanded down pretty weird looking...could make for an interesting sci-fi artifact look.
While I was waiting for stuff to dry I found this interesting video on YouTube. I suspected everything at Warmoth was performed with CNC but apparently they're still doing things the old-fashioned way. You know, in this era of CNC and Plek I find it interesting that the neck pocket/heel joint on my Warmoth is is more precise than on any of my G&L guitars (CNC or otherwise) and the frets on my PRS (leveled and crowned by hand back then) are better than the fretwork on my guitars that have been worked over by a Plek machine.
Shot the new can of color and then two cans of clear. In addition to the finishing instructions at ReRanch I found some good info at StewMac worth checking out.
Here is the body after shooting the clear. It is a bit funky looking but I hear we can fix it in the mix!

From some angles and under certain light it appears more blue and from others it appears more green. It's going to turn out just as I had hoped.

Next onto the initial block sanding to get a couple of sags out and rough it down. Let it sit for a few weeks and start the fine sanding and polishing. By the way, I just ordered the pickups for this guitar and a tortoise-shell pick guard.
I threw the stuff on the body to get a sense of what it might look like. The body has yet to be sanded beyond a quick 400 grit block sanding and under this light the color looks very blue. Looks pretty damn ugly!

Kinda worried about that color so I took it outside in direct sunlight and am very pleased with the way I imagine it will turn out. The camera still cannot capture all the green in it. It is definitely a shade or two more green than in these photos. I really like this color scheme.


The bridge I selected is a Barden with compensated brass saddles. Word is that this is a good choice for guitars with a flatter radius, I guess we'll find out. I have another bridge on hand if this unit doesn't work out.
Here are the pickups: Lindy Fralin Stock Tele hybrid stagger set. If you're guitar has a larger-than-vintage radius you want the hybrid stagger option.

Okay, so the finish cured and I started wet sanding the clear coat down starting with 800 grit paper all the way to the finest grade micro mesh.
How did it turn out? Following all the directions, being patient, working as carefully as I could the end result was a total hack job. Yeah, the body looks like shit to be honest.
Here and there it's okay but even where the clear coat is mirror perfect the underlying metallic coat reveals hundreds of pesky imperfections. I even sanded through in one tiny spot on an edge.
Worst, wet sanding involves water and I accidentally let a little into the holes and the wood swelled up terribly and ruined the finish in those areas.
I could use a touch-up paint pen but I'm sick to death of paying $11 shipping from ReRanch on everything (I've already paid a $22 amateur tax as it is).
This is the first, only, and last body I ever paint with a metallic. The amount I spent in supplies and shipping charges is already more than the cost from Warmoth to finish it correctly and that doesn't even take into consideration all the time and energy I expended. I had been warned that no 'rattle can' paint job can compare to a factory finish and now I get it. However, I think I could do pretty well with a solid color.Next time I'll go for something like vintage white, more coats, and see how it goes.
There will never be a next time.
Anyhoo, I put Ego V. 2b on the job of buffing and he enjoyed the task.

Ordered the last of the parts (knobs, control plate, pots, etc....)
I mounted the tuners to the neck as well as the bridge and neck to the body. I wanted to get a rough estimate about the action. Here we are looking green and scratchy:

I threw the pickups on and the pickguard. The action is surprising good. The nut is perfect and the strings are lower than 1/16th at the 12th fret. A little string sizzle but that's the way I like things (see tips).
Okay, I went with CTS 250K audio taper pots, a CRL switch, Switchcraft jack, Orange Drop cap, Electrosocket jack, cloth push-back wire, and heavy knurl knobs. It took about an hour to install all the copper shielding tape and then wired it all up. Something must have gone horribly wrong because after soldering the electronics everything worked the first time. This never happens ;-) Actually, soldering is the one thing I spent a lot of time practicing on so I was pretty confident going into this aspect.
Here we see the finished product where we started out (about 6.5 pounds)

An outdoor shot (the iPad camera is just incapable of representing the green in this guitar)


I started out with a set of 10s on it but it seems to prefer 9s.
What I hate about this guitar is the weirdly small body (Warmoth bodies are not true Fender spec) and the one I got was weight-relieved such that, honestly, the guitar is just too light and neck-heavy.
Things I would change if I were to do it over again:
Beefier frets -- I kinda hate those narrow things I ordered
I'd get a real Fender body
Locking tuners next time
Bone nut -- the thing on mine just does not feel good and there are tuning issues with the B-string because it is hanging up in the nut slot so that's something I'll have to deal with when I level and dress the frets.
But those Fralin pickups are fantastic.
What we have here is a Warmoth Tele body (chambered alder) and a quarter sawn maple neck featuring a satin nitro finish, a kingwood fretboard, stainless steel medium jumbo frets, 10-16" compound radius, and abalone position dots. The neck carve is the asymmetrical "SRV" ... "like a glove." I'll be adding to and editing this article as things progress.

Check out this neck-to-body joint. That's high-tolerance, precision work; I've never seen a neck/body joint that precise before on a T-style guitar.

The fretboard is just stunning in person. The photo doesn't do it justice.

I still haven't decided on pickups. Thinking SD Antiquities but open to suggestions.
Part II
After much agonizing and deliberation I decided that my original choices, coral and white, were out. The color is........ ReRanch Ocean Turquoise. Now, I wanted this guitar to be a warm color not a cool blue, however, the green abalone dots and the browns and tans of the fretboard convinced me that blue was the way to go. However, RROT has a lot of green in it (in fact, it is a green more than a blue) and combined with a tortoise shell pick guard I can keep the guitar leaning in a warmer direction.
When I saw this bass online I was finally convinced! This might be a Sherwood Green but the ReRanch OT has more green in it than a Fender turquoise and more blue than Fender's Sherwood Green (if all that makes sense) so it should be somewhere in the right neighborhood.

I ordered sanding supplies, sealer, and other assorted finishing stuff from StuMac and the primer, paint and clear coat from ReRanch.
Part III
The first coats of 'sand and seal' followed by sanding with #400 grit paper. Two coats on day one, sand, two coats on day three, sand and prepare for the primer.
It's prime time!
Ah, not ready for prime time. The ReRanch primer I bought was defective (under-pressurized as it turns out). About half way through the top the can just puked up a gob of thick primer on my guitar. What a mess. It wasn't from lack of shaking or a bad nozzle (I tried three) it was just a dud. Contact ReRanch and they had a new can on the way within hours. Nice service.
The fresh can of primer showed up and there were no problems at all. The primer layers are done. Four coats lightly sanded with #400 grit paper -- enough to take the shine off but textured enough for the color coat to grab onto.

This photo was taken under an umbrella so it doesn't show its actual color which is bright white. Also, there are a few shadows being cast upon the body.
Ordered a respirator from StuMac so I can shoot the color and clear layers indoors to ensure no dust gets into the finish.
The respirator is not optional folks and I highly recommend you pony up. They're not expensive and they work quite well.

Part IV
Okay, so I shot two cans of ocean turquoise on the body and it looked pretty good; I'd give it a B or B+ but there were a couple of spots that I didn't like. The general approach is to keep shooting color coats until you get what you want but I am trying to avoid a huge buildup of finish (think "think skin") so I wet sanded it all back down to about the first color layer (sanded through to the primer in a few spots) and ordered another can of OT from RR. As a side note, that OT sanded down pretty weird looking...could make for an interesting sci-fi artifact look.
While I was waiting for stuff to dry I found this interesting video on YouTube. I suspected everything at Warmoth was performed with CNC but apparently they're still doing things the old-fashioned way. You know, in this era of CNC and Plek I find it interesting that the neck pocket/heel joint on my Warmoth is is more precise than on any of my G&L guitars (CNC or otherwise) and the frets on my PRS (leveled and crowned by hand back then) are better than the fretwork on my guitars that have been worked over by a Plek machine.
Shot the new can of color and then two cans of clear. In addition to the finishing instructions at ReRanch I found some good info at StewMac worth checking out.
Here is the body after shooting the clear. It is a bit funky looking but I hear we can fix it in the mix!

From some angles and under certain light it appears more blue and from others it appears more green. It's going to turn out just as I had hoped.

Next onto the initial block sanding to get a couple of sags out and rough it down. Let it sit for a few weeks and start the fine sanding and polishing. By the way, I just ordered the pickups for this guitar and a tortoise-shell pick guard.
I threw the stuff on the body to get a sense of what it might look like. The body has yet to be sanded beyond a quick 400 grit block sanding and under this light the color looks very blue. Looks pretty damn ugly!

Kinda worried about that color so I took it outside in direct sunlight and am very pleased with the way I imagine it will turn out. The camera still cannot capture all the green in it. It is definitely a shade or two more green than in these photos. I really like this color scheme.


The bridge I selected is a Barden with compensated brass saddles. Word is that this is a good choice for guitars with a flatter radius, I guess we'll find out. I have another bridge on hand if this unit doesn't work out.
Here are the pickups: Lindy Fralin Stock Tele hybrid stagger set. If you're guitar has a larger-than-vintage radius you want the hybrid stagger option.

Okay, so the finish cured and I started wet sanding the clear coat down starting with 800 grit paper all the way to the finest grade micro mesh.
How did it turn out? Following all the directions, being patient, working as carefully as I could the end result was a total hack job. Yeah, the body looks like shit to be honest.
Here and there it's okay but even where the clear coat is mirror perfect the underlying metallic coat reveals hundreds of pesky imperfections. I even sanded through in one tiny spot on an edge.
Worst, wet sanding involves water and I accidentally let a little into the holes and the wood swelled up terribly and ruined the finish in those areas.
I could use a touch-up paint pen but I'm sick to death of paying $11 shipping from ReRanch on everything (I've already paid a $22 amateur tax as it is).
This is the first, only, and last body I ever paint with a metallic. The amount I spent in supplies and shipping charges is already more than the cost from Warmoth to finish it correctly and that doesn't even take into consideration all the time and energy I expended. I had been warned that no 'rattle can' paint job can compare to a factory finish and now I get it. However, I think I could do pretty well with a solid color.
There will never be a next time.
Anyhoo, I put Ego V. 2b on the job of buffing and he enjoyed the task.

Ordered the last of the parts (knobs, control plate, pots, etc....)
I mounted the tuners to the neck as well as the bridge and neck to the body. I wanted to get a rough estimate about the action. Here we are looking green and scratchy:

I threw the pickups on and the pickguard. The action is surprising good. The nut is perfect and the strings are lower than 1/16th at the 12th fret. A little string sizzle but that's the way I like things (see tips).
Okay, I went with CTS 250K audio taper pots, a CRL switch, Switchcraft jack, Orange Drop cap, Electrosocket jack, cloth push-back wire, and heavy knurl knobs. It took about an hour to install all the copper shielding tape and then wired it all up. Something must have gone horribly wrong because after soldering the electronics everything worked the first time. This never happens ;-) Actually, soldering is the one thing I spent a lot of time practicing on so I was pretty confident going into this aspect.
Here we see the finished product where we started out (about 6.5 pounds)

An outdoor shot (the iPad camera is just incapable of representing the green in this guitar)


I started out with a set of 10s on it but it seems to prefer 9s.
What I hate about this guitar is the weirdly small body (Warmoth bodies are not true Fender spec) and the one I got was weight-relieved such that, honestly, the guitar is just too light and neck-heavy.
Things I would change if I were to do it over again:
Beefier frets -- I kinda hate those narrow things I ordered
I'd get a real Fender body
Locking tuners next time
Bone nut -- the thing on mine just does not feel good and there are tuning issues with the B-string because it is hanging up in the nut slot so that's something I'll have to deal with when I level and dress the frets.
But those Fralin pickups are fantastic.